Turn Instructions/en: verschil tussen versies
Bijgewerkt vanwege een nieuwe basisversie van de bronpagina |
Nieuwe pagina aangemaakt met '* Click on <font color=blue size="+2"><b>+</b></font> and add <b>Free text</b>. ** Add <i>maximum three</i> place names (but also indications such as "andere richtingen", "doorgaand verkeer"), which are on the signs in white-on-blue, in one block of free text. ** Text in white / brown blocks is only used if the sign contains no other text and you absolutely want to fill in the signage, otherwise do not fill in anything so that the standard road name is indicat...' |
||
| Regel 2: | Regel 2: | ||
[[Category:Editing aspects]] | [[Category:Editing aspects]] | ||
<languages /> | <languages /> | ||
==Turn instructions== | |||
== | A <i>Turn instruction</i> (TI) is the set of text, images and spoken words that can be indicated at Junction arrows. | ||
{{Clear}} | {{Clear}} | ||
< | This page further elaborates on the Turn instructions panel which can be accessed by clicking on <i>Instructions</i>. When there is a pencil behind <i>Instructions</i>, instructions have already been defined for this [[Junction Arrows|Junction Arrow]]. When there are no directions (yet), a "+" is displayed. | ||
[[File: | [[File:NavPmtBewerkAanwijzingen.png|right|250px]] | ||
The Turn instructions panel contains the following components: | |||
< | * [[#Visual_instructions|Visual instructions]] | ||
* [[#Towards|Towards]] | |||
* [[#Exit Signs|Exit signs]] | |||
* [[#Voice prompts|Voice prompts]] | |||
* [[#TTS|TTS]] | |||
<br> | |||
<div lang="nl" dir="ltr" class="mw-content-ltr"> | <div lang="nl" dir="ltr" class="mw-content-ltr"> | ||
| Regel 25: | Regel 28: | ||
</div> | </div> | ||
[[File:A12-ri-Utecht.png|left|250px]] | [[File:A12-ri-Utecht.png|left|250px]] | ||
{{Clear}} | {{Clear}} | ||
===Visual instructions=== | |||
=== | Visual instructions can consist of a [[Road shield]] and/or Free text. | ||
For road shields, see the [[Road shield|Road shield]] page. | |||
If no instructions have been added to the turn before, proceed as follows: | |||
* Remove the existing field. | |||
* | * Click on the <font color=blue size="+2"><b>+</b></font> and select <b>Road shield</b>. | ||
* | ** See further on the [[Road shield|Road shield]] page. | ||
** | ** Do not enter text in the shield. The text is entered in the <b>Free text</b>. | ||
** | |||
* Click on <font color=blue size="+2"><b>+</b></font> and add <b>Free text</b>. | |||
* | ** Add <i>maximum three</i> place names (but also indications such as "andere richtingen", "doorgaand verkeer"), which are on the signs in white-on-blue, in one block of free text. | ||
** | ** Text in white / brown blocks is only used if the sign contains no other text and you absolutely want to fill in the signage, otherwise do not fill in anything so that the standard road name is indicated. | ||
** | ** Note the ' / ' as a separation between place names. | ||
** | ** If there are no direction signs, the street name (without road number) is filled in.<br> | ||
** | |||
''Notes''' | |||
'' | * In the [[Waze app|app]] two full lines are available, what doesn't fit is not displayed. | ||
* In | * Where applicable, use the 1200 sign for the official names. | ||
* | * For the time being, we do not use images such as [[File:LuchthavenIcon.png|24px]] in the Visual instructions. | ||
* | * If a sign shows a place name with a road number in brackets behind it - for example Amsterdam (A4) - do not add this road number to the visual instructions. If the road number is mentioned without brackets, do indicate the road number. | ||
* | * For the time being, we keep the long names on the exits and do not replace them with instructions. | ||
* | * The <i>Navigation instructions</i> make the use of [[Wayfinder]] constructions completely redundant. | ||
* | |||
===Towards=== | |||
=== | * The default rule is to fill the Towards field with the <i>Place Names</i>. | ||
* Leave the Towards field blank for highways and exits. | |||
* | |||
* | |||
===Exit signs=== | |||
[[File:WegSchilAfslagborden.png|right|150px]] | [[File:WegSchilAfslagborden.png|right|150px]] | ||
* | * For numbered exits, add an exit sign with the correct exit number, otherwise do not add an exit sign. | ||
Versie van 6 mei 2025 08:40
Turn instructions
A Turn instruction (TI) is the set of text, images and spoken words that can be indicated at Junction arrows.
This page further elaborates on the Turn instructions panel which can be accessed by clicking on Instructions. When there is a pencil behind Instructions, instructions have already been defined for this Junction Arrow. When there are no directions (yet), a "+" is displayed.
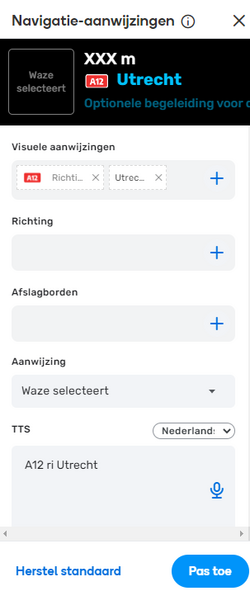
The Turn instructions panel contains the following components:
Deze pagina gaat verder in op het panel Navigatie-aanwijzingen panel wat opgeroepen kan worden door te klikken op Aanwijzingen (Instructions). Wanneer er achter Aanwijzingen een potloodje staat zijn er al aanwijzingen gedefinieerd bij deze Junction Arrow (kruispuntpijl). Wanneer er (nog) geen aanwijzingen zijn wordt een "+" getoond.

Het Navigatie-aanwijzingen panel bevat de volgende onderdelen:
Visual instructions
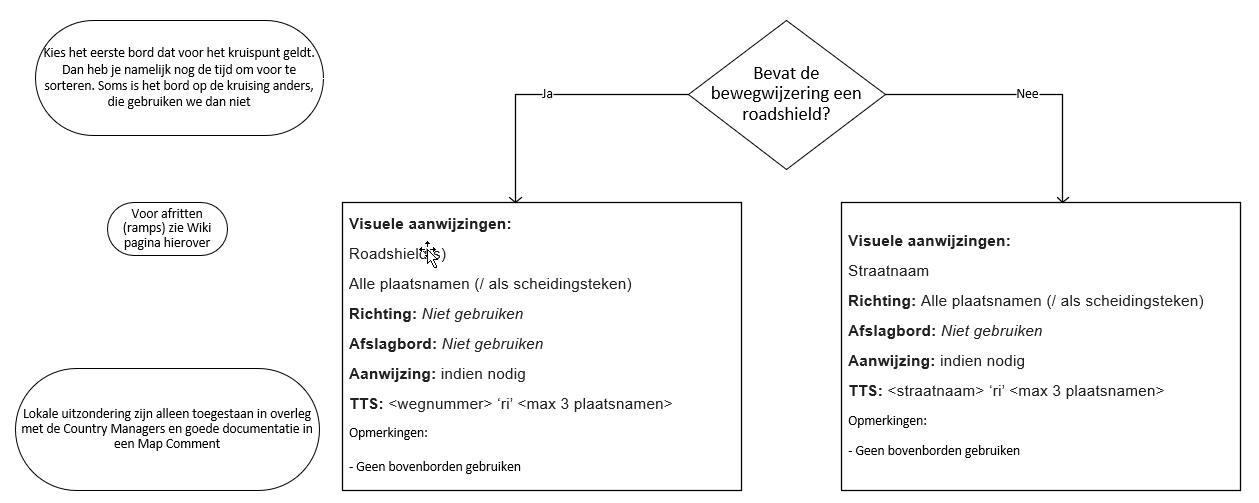
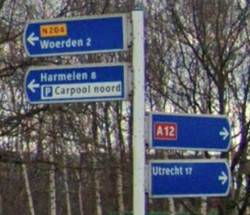
Visual instructions can consist of a Road shield and/or Free text. For road shields, see the Road shield page.
If no instructions have been added to the turn before, proceed as follows:
- Remove the existing field.
- Click on the + and select Road shield.
- See further on the Road shield page.
- Do not enter text in the shield. The text is entered in the Free text.
- Click on + and add Free text.
- Add maximum three place names (but also indications such as "andere richtingen", "doorgaand verkeer"), which are on the signs in white-on-blue, in one block of free text.
- Text in white / brown blocks is only used if the sign contains no other text and you absolutely want to fill in the signage, otherwise do not fill in anything so that the standard road name is indicated.
- Note the ' / ' as a separation between place names.
- If there are no direction signs, the street name (without road number) is filled in.
Notes'
- In the app two full lines are available, what doesn't fit is not displayed.
- Where applicable, use the 1200 sign for the official names.
- For the time being, we do not use images such as
 in the Visual instructions.
 - If a sign shows a place name with a road number in brackets behind it - for example Amsterdam (A4) - do not add this road number to the visual instructions. If the road number is mentioned without brackets, do indicate the road number.
- For the time being, we keep the long names on the exits and do not replace them with instructions.
- The Navigation instructions make the use of Wayfinder constructions completely redundant.
Towards
- The default rule is to fill the Towards field with the Place Names.
- Leave the Towards field blank for highways and exits.
Exit signs

- For numbered exits, add an exit sign with the correct exit number, otherwise do not add an exit sign.
Aanwijzing
Voeg zo nodig een aanwijzing toe of laat "Waze selecteert" staan.
TTS
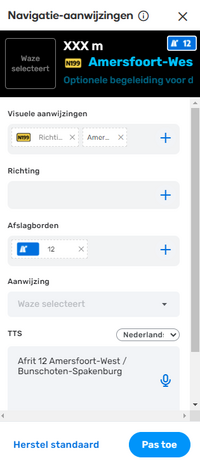
Vul het TTS veld in als volgt:
- Wanneer geen roadshield de Straatnaam of anders indien van toepassing: "Wegnummer" of "Afrit"
- ri (bij afrit weglaten)
- Maximaal drie plaatsnamen (indien van toepassing), gescheiden door een “ / “.
Opmerkingen en tips
- Als het bord een plaatsnaam met daarachter een wegnummer tussen haakjes staat - bijvoorbeeld Amsterdam (A4) - dit wegnummer niet toevoegen bij de gesproken aanwijzingen.
- TTS gelijk maken aan tekst in Wegschild-blok is wel zo handig, maar beste aanpak kan per situatie verschillen.
- Klik op het microfoontje om te controleren hoe de instructie wordt uitgesproken.
Hoofdregel
Hoe om te gaan met road shields, plaatsnamen en TTS.
- Voor op- en afritten zie de Ramp pagina.
Ring wegen
Wanneer een "RING" genoemd wordt op de borden dan "RING" ook opnemen in de Visuele aanwijzingen en de TTS. Zie ook onderstaande voorbeelden.


Voorbeelden
Hieronder een aantal voorbeelden uit de praktijk:
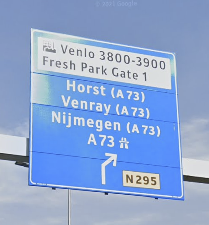
- Visuele aanwijzing: Wel wegschild, tekst: A73 / Horst / Venray / Nijmegen
- Wegschild: N295
- TTS: N295 ri A73 / Horst / Venray / Nijmegen
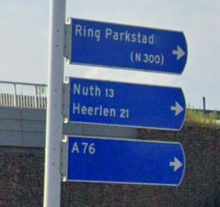
- Visuele aanwijzing: Geen wegschild, tekst: Ring Parkstad / Nuth / Heerlen / A76
- Wegschild: Geen
- TTS: Ring Parkstad ri Nuth / Heerlen / A76
En verder
- Navigatie aanwijzing bij Grensovergangen.
